Maker vs Taker Fees in Crypto Arbitrage: Fee Tiers, Rebates and Which Leg to Rest Monday November 16th, 2026 – Posted in: Arbitrage Software, cryptoarbitrage software
Maker vs Taker Fees in Crypto Arbitrage: Fee Tiers, Rebates and Which Leg to Rest in the Book
Trading fees are the largest fixed cost of crypto arbitrage. On a typical entry-tier account they take two thirds of a 0.30% price gap before slippage and transfers are even counted. This guide explains how maker and taker fees work, how to turn any exchange fee schedule into a break-even spread for two-leg, triangular and spot-perp trades, what VIP tiers, fee-token discounts and rebates are really worth, and when it pays to rest one leg as a maker order instead of crossing the spread on both exchanges.
- Maker vs taker fees: the short answer
- How crypto exchanges charge trading fees
- Fee math for one arbitrage trade
- Break-even spread by strategy
- VIP tiers, fee tokens and rebates: what they are worth
- Which leg to rest as a maker order
- Taker-taker vs maker-taker: an expected-value model
- Hidden fee effects that break arbitrage bots
- Step by step: building your fee model
- Risks and limitations
- FAQ
Maker vs taker fees: the short answer
Short answer: a taker order executes immediately against orders already in the book (a market order, or a limit order priced to cross the spread) and pays the taker fee. A maker order is a limit order that rests in the order book and adds liquidity until someone else trades against it; it pays the lower maker fee, which at high volume tiers can be zero or even a rebate. In arbitrage, two taker legs give speed and certainty but cost the most; resting one leg as a maker order can cut the fee bill substantially, at the price of fill uncertainty and adverse selection. The right choice depends on the size of the gap, the fee difference and how fast prices move between the two venues.
Almost every centralized crypto exchange uses this maker-taker model. The exchange wants deep order books, so it charges less to traders who supply resting orders and more to traders who remove them. For a long-term investor the difference between 0.08% and 0.10% hardly matters. For an arbitrage trader who captures gaps of a few tenths of a percent and repeats the trade hundreds of times a month, it decides whether the strategy is profitable at all.
Illustrative fee rates for typical tiers, not the schedule of a specific exchange. Always use the current fee page of the exchanges you trade.
How crypto exchanges charge trading fees
A fee schedule looks simple: two percentages per tier. In practice five separate settings decide what you really pay on an arbitrage trade.
1. Maker rate and taker rate
The fee is a percentage of the traded notional. On spot markets of large exchanges, entry-tier rates are commonly in the range of about 0.08% to 0.10% for makers and 0.10% for takers. Some exchanges, especially those built mainly for retail buyers, charge much more at their lowest tier, with taker fees of 0.25% to 0.60%. Perpetual futures are usually cheaper per trade, often around 0.02% maker and 0.05% taker at the entry tier, because those markets live on high turnover.
2. Volume tiers (VIP levels)
Fees fall as your 30-day trading volume grows, sometimes also depending on your balance of the exchange’s own token. The first tiers usually reduce fees only slightly; the large reductions start at volumes that a small account will not reach without many trades. Each exchange counts its own volume, so splitting your activity across many venues keeps you at the entry tier everywhere.
3. Fee-token discounts
Several exchanges reduce fees, often by about 20% to 25%, when you pay them in the exchange’s own token. That discount is real, but holding the token is a price exposure that has nothing to do with your arbitrage.
4. Which asset the fee is taken from
Unless you pay in a fee token, the exchange usually deducts the fee from the asset you receive: buy BTC with USDT and the fee comes out of the BTC; sell BTC for USDT and it comes out of the USDT. For arbitrage this matters because your coin balance on the buying exchange slowly shrinks, and your hedge sizes must account for it.
5. Market type and promotions
Spot, margin, perpetual and dated futures often have separate schedules. Exchanges also run zero-fee promotions on selected pairs or stablecoin pairs. Promotions are useful while they last, but an arbitrage setup that only works at zero fees on one pair is fragile: the promotion can end with little notice.
| Fee setting | Typical range (illustrative) | Why it matters for arbitrage |
|---|---|---|
| Spot taker, entry tier, large exchanges | about 0.08% to 0.10% | Sets the break-even gap for fast two-leg trades |
| Spot taker, entry tier, retail-focused venues | about 0.25% to 0.60% | One such leg can cost more than the whole gap |
| Spot maker, entry tier | about 0.00% to 0.10% | Decides whether resting a leg is worth the fill risk |
| Perpetual futures maker / taker, entry tier | about 0.02% / 0.05% | Cheaper legs for spot-perp and funding trades |
| Top VIP / market-maker programs, maker | about 0.00% down to small rebates | Only reachable with very large, steady volume |
| Fee-token discount | about 20% to 25% off | Lower cost, but adds token price risk |
Fee math for one arbitrage trade
Start with the most common setup: pre-funded balances on two exchanges, buy where the coin is cheaper, sell where it is dearer at the same moment, and rebalance later. This is the model behind most cross-exchange crypto arbitrage, because it avoids waiting for a blockchain transfer during the trade. (Transfer costs and rebalancing are covered in our guide to withdrawal fees and transfer times.)
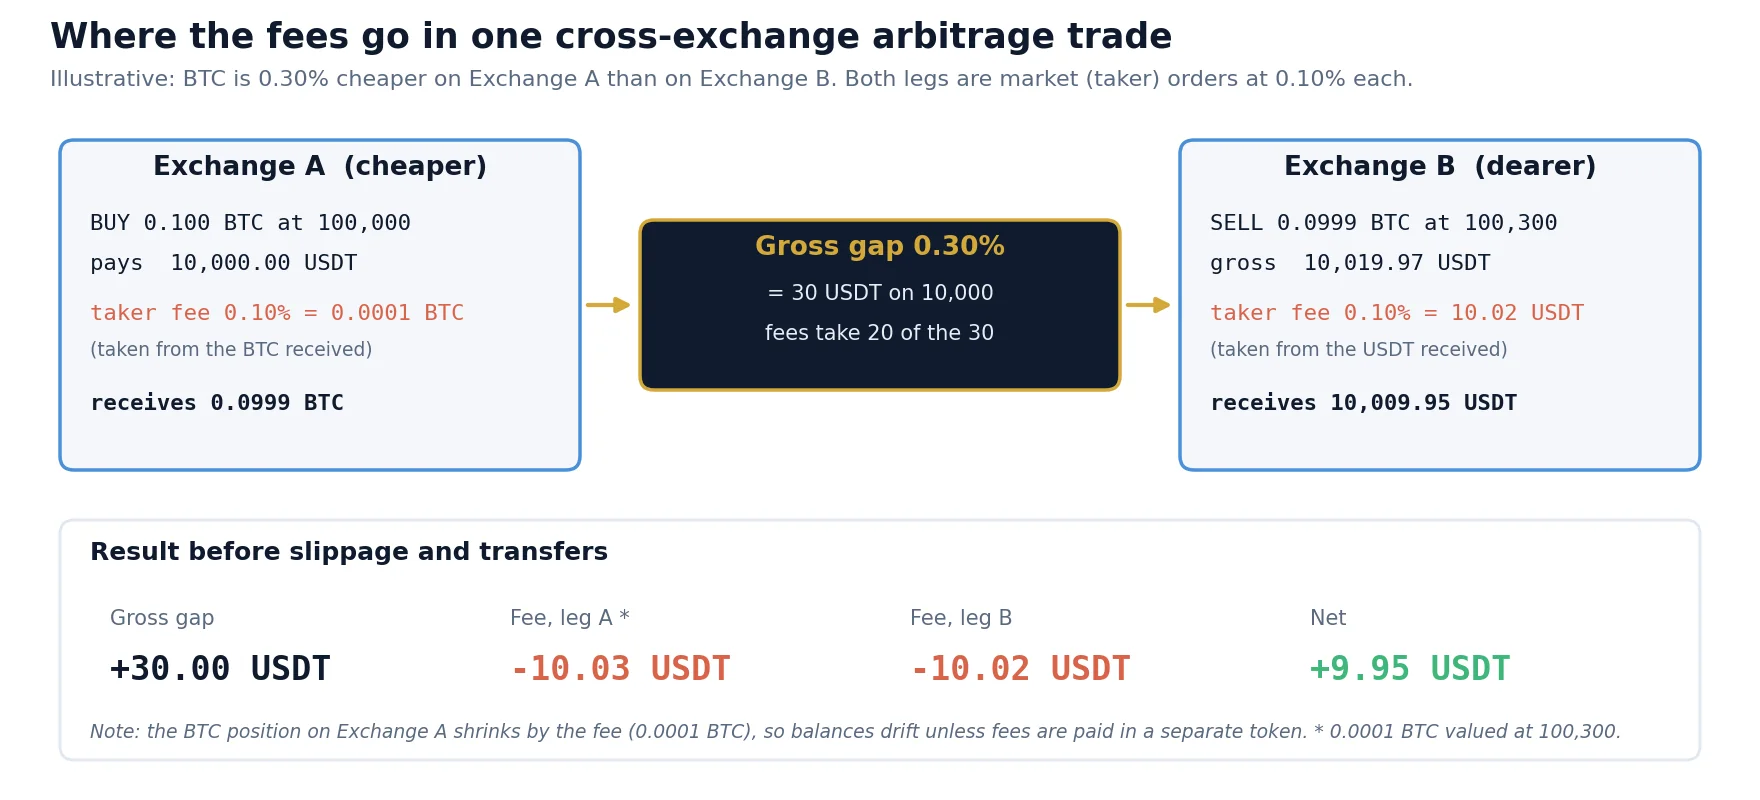
The worked example in numbers: BTC trades at 100,000 USDT on Exchange A and 100,300 USDT on Exchange B, a gross gap of 0.30%. You buy 0.1 BTC on A for 10,000 USDT. The taker fee of 0.10% is taken from the BTC, so you receive 0.0999 BTC. You sell those 0.0999 BTC on B for 10,019.97 USDT; the 0.10% fee there is 10.02 USDT, leaving 10,009.95 USDT. Net result: +9.95 USDT, or about 0.10% of the notional. Two thirds of the gap went to fees.
Because fees are percentages of notional, the formula is the same for any trade size. That has an important consequence: you cannot “out-size” a fee problem. If the gap is smaller than the sum of the fee rates, a bigger trade only loses more. Size helps only with fixed costs such as withdrawal fees, and it hurts with slippage, because large orders walk deeper into the book.
Adding slippage and rebalancing
| Item (10,000 USDT per leg) | Taker + taker, entry tier | Taker + taker, 25% token discount | Maker on A + taker on B |
|---|---|---|---|
| Gross gap captured | 0.30% = 30.00 | 0.30% = 30.00 | 0.33% = 33.00 * |
| Fee, leg A | 0.10% = 10.00 | 0.075% = 7.50 | 0.02% = 2.00 |
| Fee, leg B | 0.10% = 10.00 | 0.075% = 7.50 | 0.10% = 10.00 |
| Slippage (0.02% per taker leg) | 4.00 | 4.00 | 2.00 |
| Rebalancing cost, amortized (0.02%) | 2.00 | 2.00 | 2.00 |
| Net per trade | 4.00 (0.04%) | 9.00 (0.09%) | 17.00 (0.17%) |
* The resting order sits 0.03% inside the touch, so the captured gap is wider when it fills. The maker column shows the result when the order fills without an adverse move; the next sections explain why that is not the whole story. All numbers illustrative.
The table shows why fee optimisation is the first lever an arbitrage trader should pull. On the same 0.30% opportunity, the net result moves from 4 to 17 USDT, a factor of four, without any change to the strategy’s signal. It also shows how thin the entry-tier, taker-taker case is: a little more slippage or one failed hedge wipes it out.
Break-even spread by strategy
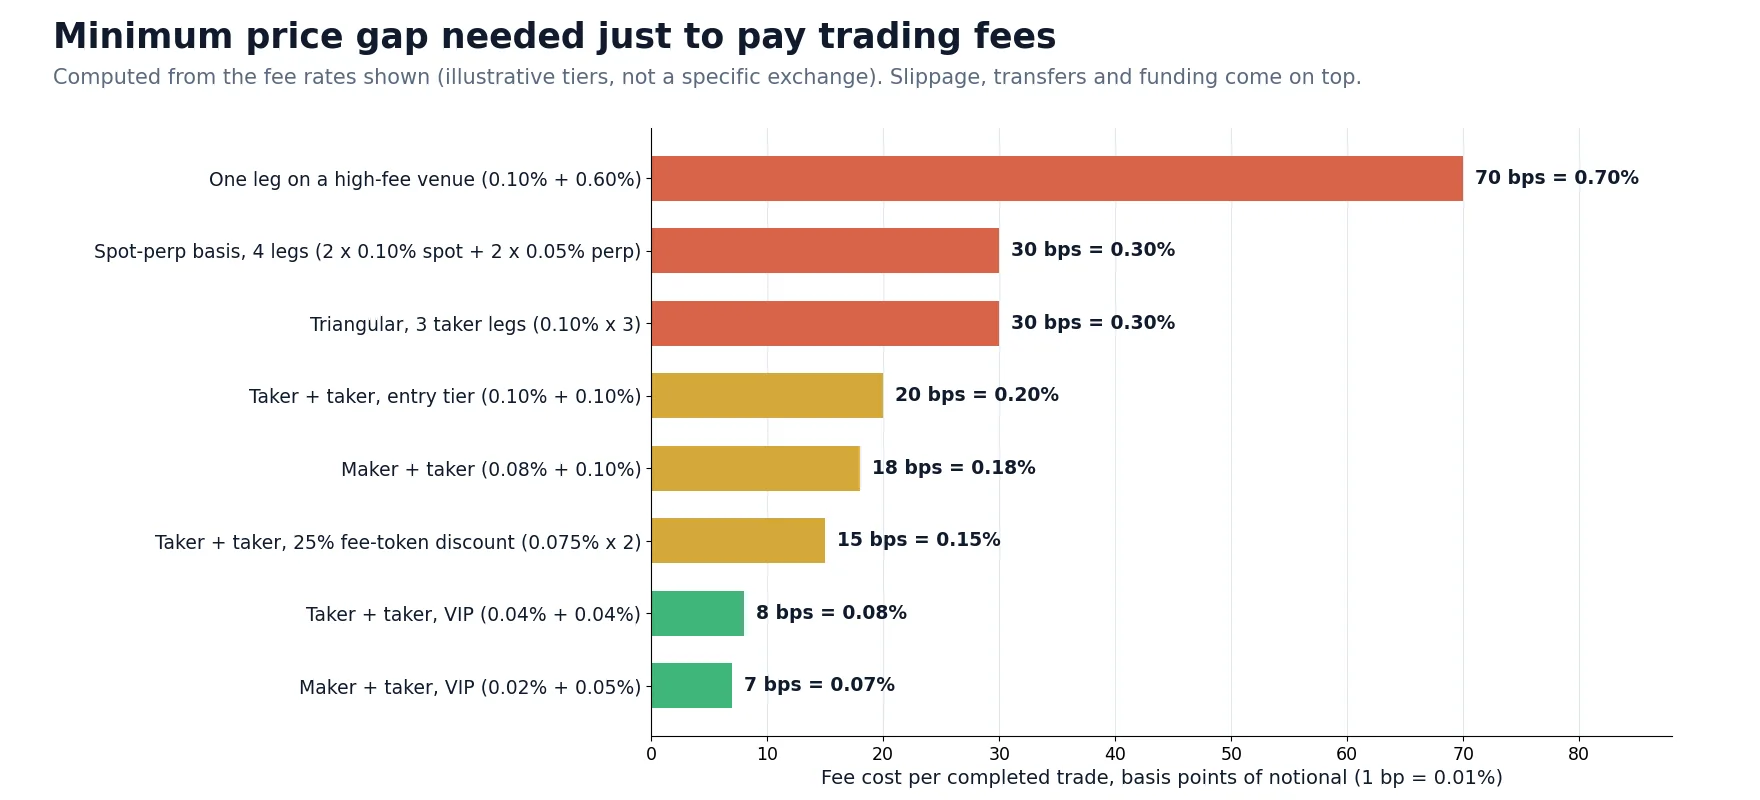
The quickest way to judge whether an opportunity is worth taking is to know your fee break-even: the minimum gap that pays all trading fees of the complete trade. Count every leg the strategy needs, including the legs that close the position later.
| Strategy | Legs that pay a fee | Fee break-even at 0.10% per spot leg | Notes |
|---|---|---|---|
| Cross-exchange, pre-funded inventory | 2 (buy A, sell B) | 0.20% | Rebalancing later adds transfer costs or a reverse trade |
| Cross-exchange, transfer-based | 2 + withdrawal fee | 0.20% + fixed fee / size | Price risk during the transfer |
| Convergence trade (open now, close when the gap closes) | 4 | 0.40% | The opening gap must pay for the closing legs too |
| Triangular on one exchange | 3 | 0.30% | See our triangular arbitrage guide |
| Spot-perp basis or funding trade | 4 (2 spot + 2 perp) | about 0.30% with 0.05% perp legs | Spread over the holding period; see funding rate arbitrage |
The convergence row is the one most often forgotten. If you open a long on the cheap venue and a short on the dear venue and wait for the gap to close, you pay four fees, not two. A 0.30% gap at entry-tier taker rates then loses money even if it closes completely.
VIP tiers, fee tokens and rebates: what they are worth
Volume tiers
Every step down the fee ladder lowers your break-even gap, and a lower break-even means more tradable opportunities, because small gaps are far more frequent than large ones. That is the real value of a lower tier: not only a cheaper trade, but more trades. The catch is the volume requirement. To estimate whether a tier is realistic, multiply your average trade size by the number of trades your strategy actually finds per month at the current break-even, not at the break-even you hope to reach.
Example: 600 trades a month of 5,000 USDT per leg, one leg per trade on each of two exchanges, gives 3 million USDT of volume per exchange. On many schedules that is still in the lower tiers. Concentrating both legs of more pairs on fewer exchanges raises volume per venue faster than adding new venues.
Fee-token discounts
A 25% discount on a 0.10% fee saves 0.025% per leg, or 0.05% per two-leg trade. On the 0.30% example above, that turned a 4 USDT trade into a 9 USDT trade. The cost is exposure to the token: if you hold 1,000 USDT worth of fee token and it falls 10%, you lose 100 USDT, which equals the discount on about 400,000 USDT of traded volume at that rate. Hold only what covers a few days of fees and top it up regularly.
Maker rebates
Negative maker fees, where the exchange pays you for resting liquidity, exist mainly in high-tier and market-maker programs with volume or quoting obligations. For most arbitrage traders they are not reachable. What is reachable is a low or zero maker fee on selected markets, and that is what makes the maker-taker approach below interesting.
Which leg to rest as a maker order
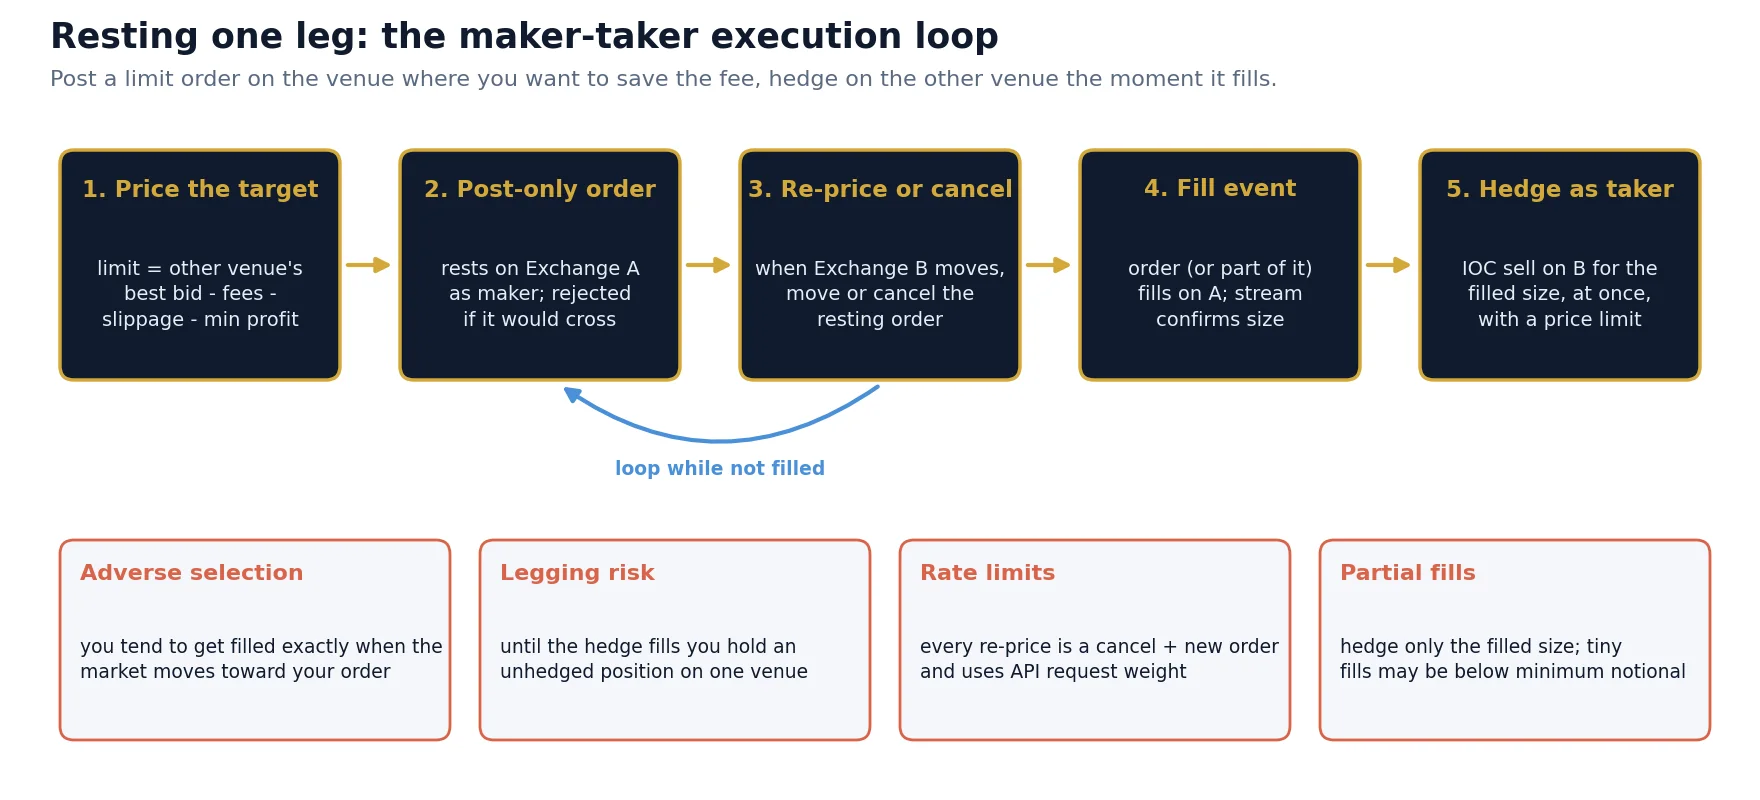
The idea is simple: instead of crossing the spread on both exchanges, you place a limit order on one exchange at a price that already contains your target profit, and you hedge on the other exchange with a taker order the moment it fills. You save the difference between the taker and maker fee on one leg, and you often capture part of that exchange’s bid-ask spread as well.
How to price the resting order
To buy on Exchange A as a maker and sell on Exchange B as a taker, the limit price on A is derived from the current best bid on B:
With a best bid on B of 100,050, a maker fee of 0.02%, a taker fee of 0.10%, 0.02% expected slippage and a 0.05% minimum profit, the bid on A is 100,050 x (1 – 0.0019) = about 99,859.9. If A’s best ask is 100,000, the order rests below it and waits for a seller. If the computed price is ever above A’s best ask, the order would cross and become a taker, so it is sent as post-only (the exchange rejects it instead of executing it as a taker); at that moment the gap is large enough to take both legs directly. Every time B’s bid moves, the order on A must be re-priced.
Choosing which leg rests
- Rest on the exchange with the larger fee difference. If one venue charges 0.10% maker and 0.10% taker, resting there saves nothing; a venue with 0.02% maker and 0.10% taker saves 0.08% per trade.
- Rest on the slower-moving book, hedge on the faster, deeper one. The hedge needs reliable liquidity at the moment of the fill. The leading, most liquid venue is usually the better place for the taker leg.
- Rest where your API is fast and the rate limits are generous. Re-pricing is a cancel plus a new order (or an amend) every time the other market moves; slow or tight limits leave stale orders in the book. See our crypto exchange API guide for rate limits and WebSocket order updates.
- Avoid resting during fast markets. When prices jump, resting orders get filled precisely when they are wrong. Pause the maker leg around large moves and fall back to taker-taker or no trade.
Adverse selection: the hidden cost of the maker leg
A resting buy order is most likely to fill when sellers become aggressive, which often means the price is falling. If the price on B falls at the same time, your hedge is sold lower than the price you used to set the limit. On average, the fills you get on a resting order are worse than the quote looked when you placed it. That average adverse move is a cost just like a fee, and it must be measured from your own fills (fill price on A versus B’s bid at the fill time and at the hedge time).
Taker-taker vs maker-taker: an expected-value model
Comparing the two approaches only on the fee rate is misleading. Taker-taker captures most opportunities it sees but pays full fees; maker-taker pays less but only fills part of the time and suffers adverse selection. A simple expected-value model per detected opportunity puts both on the same scale:
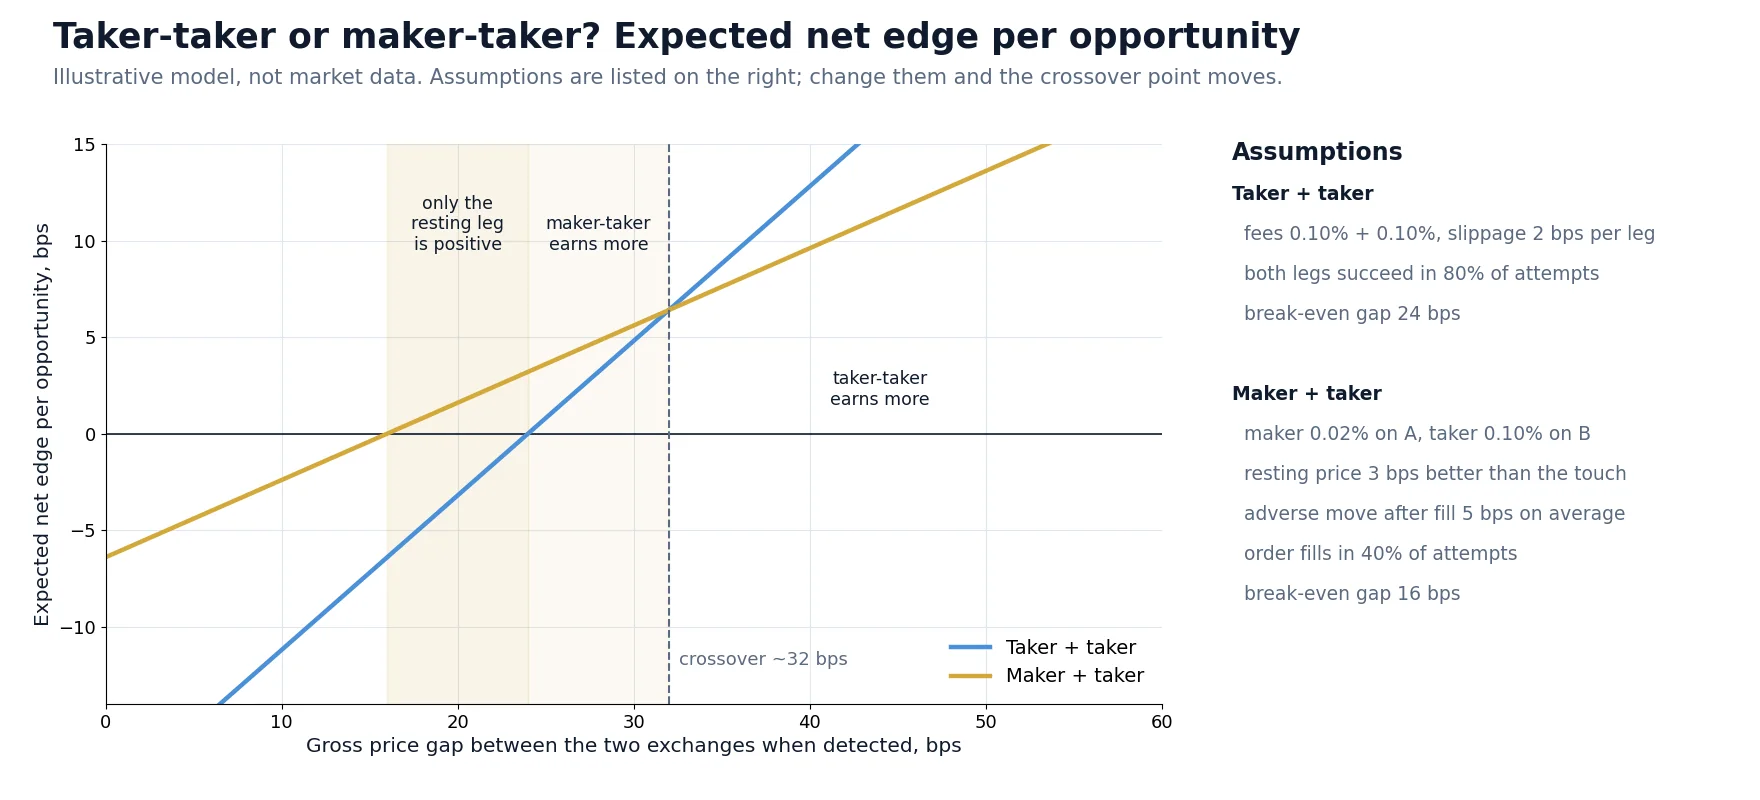
With the assumptions in the chart (taker fees 0.10% on both venues, 0.02% maker fee, 80% capture for taker-taker, 40% fill rate and a 0.05% average adverse move for the resting order), three zones appear:
| Gross gap | Taker-taker | Maker-taker | Practical conclusion |
|---|---|---|---|
| Below 0.16% | Loses | Loses | No trade |
| 0.16% to 0.24% | Loses | Positive | Only a resting leg makes these gaps tradable |
| 0.24% to 0.32% | Positive | Higher | Maker-taker preferred if the fill rate holds |
| Above 0.32% | Higher | Positive | Take both legs immediately; waiting costs more than the fee |
The model is deliberately simple and the numbers are illustrative, but the shape is general: resting a leg pays when gaps are small and frequent; crossing both legs pays when gaps are large and short-lived. Many practical systems therefore use both: a resting leg for the steady, small gaps, and immediate taker execution when a large gap appears. Large gaps are also where latency matters most; see our guide to low-latency crypto trading.
Hidden fee effects that break arbitrage bots
- Fee taken from the received coin. The buy leg delivers slightly less than the ordered quantity. If the bot hedges the ordered quantity instead of the received one, every trade leaves a small unhedged position that accumulates.
- Quantity and price rounding. Exchanges round order size to a lot step and price to a tick size. On small orders, rounding can change the hedge size by more than the fee itself.
- Minimum notional. A partial fill of a resting order may be too small to hedge on the other venue, leaving a residual position until more fills arrive.
- Fee token running out. When the fee-token balance hits zero, most exchanges silently switch to charging the received asset at the full rate; break-even and hedge sizes change at once.
- Tier changes. Tiers are recalculated daily on a rolling window. A quiet week can push you down a tier and raise your break-even without any change in your settings.
- Different quote currencies. A gap between a USDT pair on one exchange and a USDC pair on another includes the USDT/USDC rate, and converting the profit back costs another fee.
- Promotional zero-fee pairs. A pair that is fee-free for takers today may not be next month; a strategy calibrated on it can turn negative overnight.
Step by step: building your fee model
1
2
3
4
5
6
7
A free way to see how often gaps above your break-even appear is to watch them in real time with the free crypto arbitrage scanner and subtract your own fee profile from the gross spreads it shows. The scanner shows price differences, not your net profit; the fee model above is what turns one into the other.
Risks and limitations
- Fee schedules change. The rates in this article are illustrative of typical tiers. Exchanges change schedules, tiers and promotions; always check their current fee pages and your account’s actual tier.
- Maker savings are not guaranteed profit. Lower fees can be eaten by adverse selection, missed hedges and partial fills. Measure before scaling.
- Legging risk. Between the fill of the resting order and the fill of the hedge you carry market risk. Use price-limited IOC hedges and a clear rule for what to do if the hedge fails.
- Volume chasing. Trading more only to reach a lower tier can lose more on unprofitable trades than the tier saves.
- Exchange and counterparty risk. Balances held on exchanges for arbitrage are exposed to that exchange’s operational and solvency risk, regardless of fees.
- Regional availability. Not every exchange, market type or promotion is available in every country. Trade only where it is legal for you.
Turn fee math into a working arbitrage setup
BJF Trading Group develops arbitrage software for crypto and forex markets. Start by watching real cross-exchange gaps with the free scanner, compare them with your own fee break-even, and move to automated execution when the numbers make sense. Read the crypto arbitrage pillar guide for the full picture of strategies and risks.
Free arbitrage scanner + short email course
Get the free scanner link and a few short, practical emails from Boris: what a price gap really means after costs, how to test a strategy before risking real money, and which tools fit your market. No hype.
FAQ
What is the difference between maker and taker fees in crypto?
A taker order executes immediately against existing orders in the book and pays the taker fee. A maker order rests in the book as a limit order until someone trades against it and pays the lower maker fee. Exchanges charge makers less because resting orders provide the liquidity that takers consume.
Is a limit order always charged the maker fee?
No. A limit order priced to cross the spread executes at once and pays the taker fee. Only the part that rests in the book and is filled later pays the maker fee. To be sure an order never pays the taker fee, send it as post-only; the exchange rejects it if it would execute immediately.
How much price gap do I need for crypto arbitrage to be profitable after fees?
At least the sum of the fees of every leg plus slippage and transfer costs. With 0.10% taker fees on two exchanges, the gap must exceed 0.20% just to pay fees; a triangular trade at the same rate needs 0.30%, and a trade that is opened and later closed on both venues pays four fees, 0.40%.
Should I use market orders or limit orders for arbitrage?
Taker orders on both legs give the highest capture rate and suit large, short-lived gaps. Resting one leg as a maker order lowers fees and suits small, frequent gaps, but adds fill uncertainty, adverse selection and legging risk. Many systems use both, depending on the size of the gap.
Are VIP fee tiers worth chasing for arbitrage?
A lower tier reduces the break-even gap and makes more opportunities tradable, which is valuable. But volume should come from trades that are profitable at your current fees; trading more only to reach a tier can cost more than the tier saves. Concentrating volume on fewer exchanges reaches tiers faster.
Do fee-token discounts make sense for arbitrage traders?
They usually lower trading costs by about 20% to 25% on exchanges that offer them, but holding the token is a price exposure. Keep only enough to cover a few days of fees and top it up, and remember that the fee falls back to the full rate in the received asset when the token balance runs out.
Why does my coin balance shrink after arbitrage trades?
Because the exchange takes the buy-side fee from the coin you receive. Buying 0.1 BTC with a 0.10% fee delivers 0.0999 BTC. Hedge the quantity you actually received and account for the fee asset, or pay fees in a separate token, otherwise small unhedged positions accumulate.
