SharpTraderのペアトレード:Directionパラメーター解説 — 全8モード 2026年05月28日 – Posted in: Arbitrage Software – Tags: pair trading, pairs trading, statistical arbitrage, z-index
BJF TRADING GROUP · 製品リファレンス
SharpTraderのペアトレード:Directionパラメーター解説 — 全8モード
Directionは、Zindexのしきい値に達したときに、ペアのどちら側を買いにし、どちら側を売りにするかを決めるパラメーターです。8つのモードは、乖離に逆張りする(平均回帰)と乖離に順張りする(モメンタム)という2つの戦略的なグループに分かれ、さらにトリガー条件そのものを反転させる例外としてInversedがあります。このページは実用的なリファレンスです。各モードの動作、発動条件、そして実際に取引するセットアップに合ったモードの選び方を説明します。
おさらい:Current ZindexとZindex Open
Current Zindexは、ペアを組む2つの銘柄間のスプレッドのリアルタイムのzスコアです。つまり、スプレッドが現在、過去の平均から標準偏差いくつ分離れているかを示します。Zindex Openは、トレーダーが設定する大きさのしきい値です。現在のzスコアの絶対値がこれを超えると、戦略はポジションを建てることができます。その後、Directionパラメーターがどちらのレッグを買いにし、どちらを売りにするかを決定します。
共和分とは何か、なぜスプレッドが平均回帰するのか、zスコアがどのように計算されるのかといった概念的な背景の全体については、FXペアトレードと統計的アービトラージに関する当社の総合ガイドをご覧ください。このページでは、Directionパラメーターとそれが取り得る8つの値に絞って説明します。
混乱の大半を解消するひとつの補足
Wikiではトリガーを「Current ZindexがZindex Openの値より大きい」と表現しています。文字どおりに読むと、現在のZインデックスがマイナスのときには成立しないことになります。実際には、この判定は大きさの比較です:|Current Zindex| > Zindex Open。Zindex Openは正の数(例:2.0)で表されるしきい値で、スプレッドが平均からどちらの方向にでも少なくともそれだけ広がったときに戦略が発動します。そして、Current Zindexの符号によって、どちら側をロング、どちら側をショートにするかが決まります。
2つの戦略グループ — そして1つの例外
すべてのDirectionモードは、2つの判断を表しています。いつ建てるか(トリガー条件)と、どちら向きに建てるか(レッグの割り当て)です。8つをまとめて見ると、3つのパターンが浮かび上がります。
- 乖離に逆張りする(平均回帰への賭け)。スプレッドが広がった状態で、平均に戻ることに賭けるトレードです。5つのモード:ZIndexBased、PriceBased、Buy1Sell2、Sell1Buy2、ZIndexSign。
- 乖離に順張りする(モメンタムへの賭け)。スプレッドが広がった状態で、さらに広がり続けることに賭けるトレードです。2つのモード:Reversed、ZIndexSignInv。
- 例外 — Inversed。トリガーが反転しています。スプレッドがしきい値を超えて広がるのを待つのではなく、スプレッドがまだバンドの内側にある間にポジションを建て、外側へ広がることに賭けます。極端な水準ではなく平均の近くで発動する唯一のモードです。
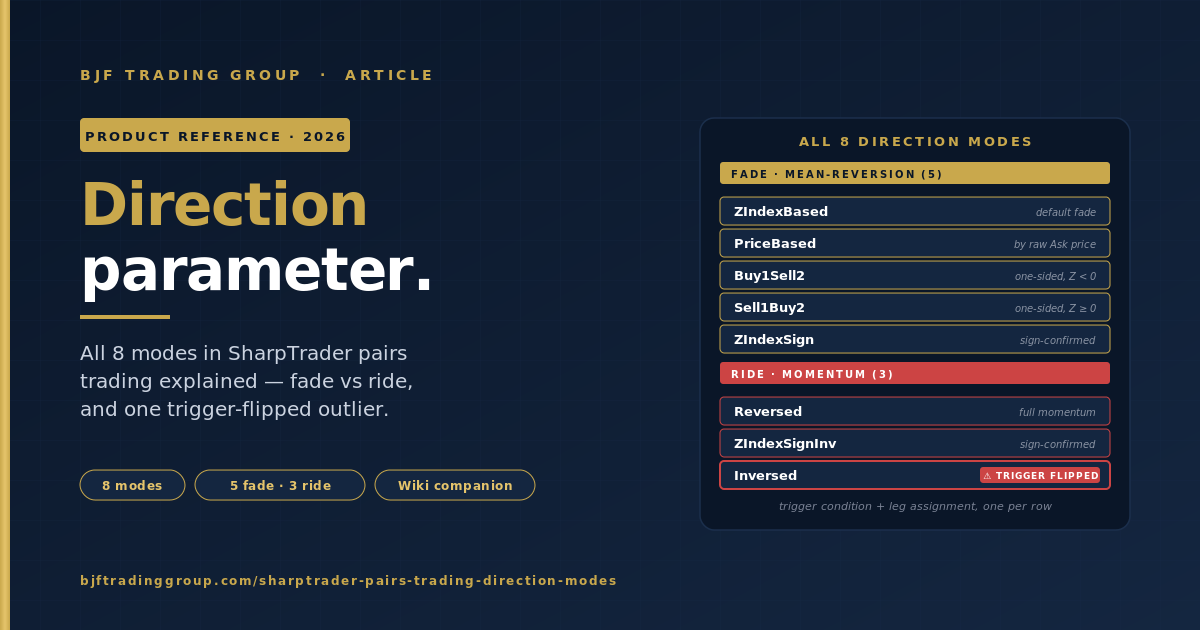
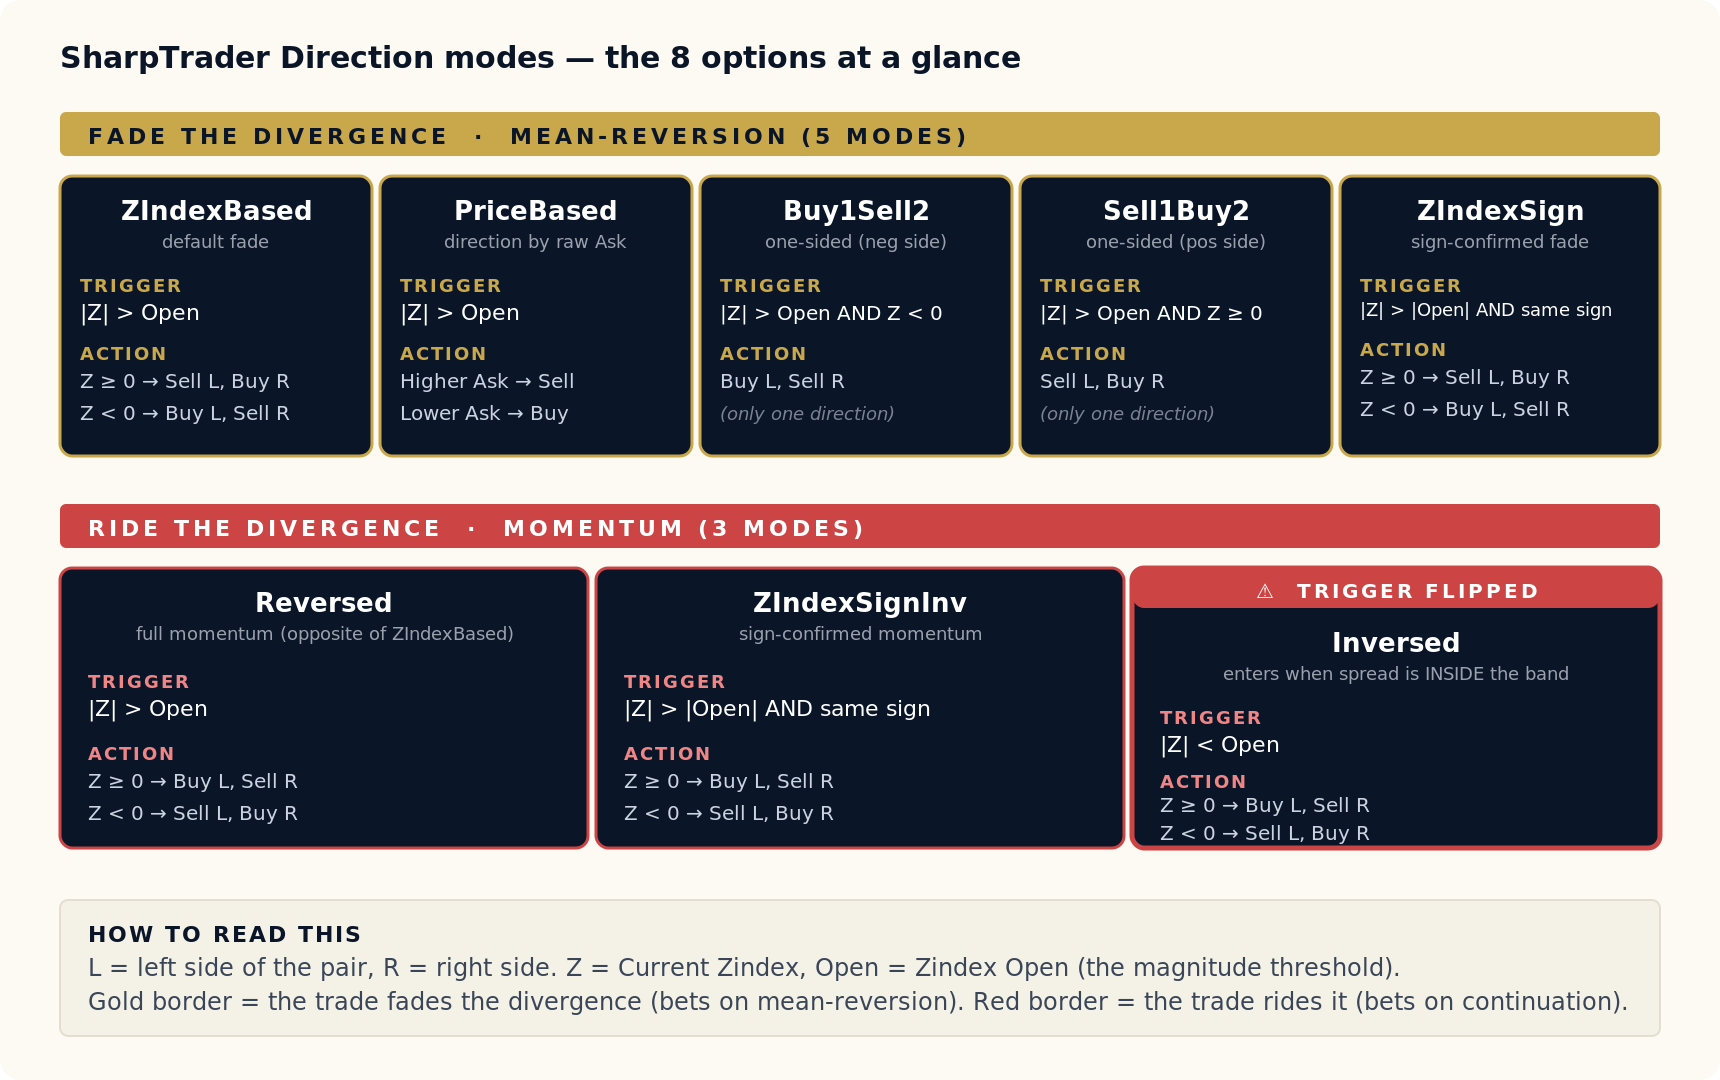
図1 — 全8つのDirectionモードの一覧。金色の枠 = 乖離に逆張り(平均回帰)。赤色の枠 = 乖離に順張り(モメンタム)。Inversedのカードには「トリガー反転」のマークが付いています。スプレッドがまだしきい値のバンド内にある間にエントリーするためです。
モード別リファレンス
以下の各モードについて、トリガー条件(発動するタイミング)、レッグの割り当てルール(どちら側を買い、どちら側を売りにするか)、具体的な数値例、想定されているセットアップの種類を示します。
ZIndexBased 逆張り
トリガー |Current Zindex| > Zindex Open
動作 Current Zindex ≥ 0 の場合 → 左側を売り、右側を買い。Current Zindex < 0 の場合 → 左側を買い、右側を売り。
例 Zindex Open = 2.0、Current Zindex = +2.3。このモードは左のレッグを売り、右のレッグを買って、スプレッドがゼロに向かって回帰することに賭けます。
使いどころ 標準の逆張りモードです。zスコアの符号を明確な方向シグナルとして信頼でき、スプレッドの両極端で対称的な動作を望む場合に使用します。最も一般的な初期設定です。
PriceBased 逆張り
トリガー |Current Zindex| > Zindex Open
動作 左側の現在のAsk > 右側の現在のAsk の場合 → 左を売り、右を買い。それ以外 → 左を買い、右を売り。
例 Zindex Open = 2.0、Current Zindex = +2.3。左のAsk = 1.0850、右のAsk = 1.2640。右のAskのほうが高いため、このモードは左を買い、右を売ります。
使いどころ:β(共和分係数)の非対称性が大きく、zスコアの符号よりもAskの生の比較のほうが信頼できる方向シグナルになる場合。2つの銘柄の絶対的な価格水準が大きく異なるペアでは、PriceBasedを好むトレーダーもいます。
Buy1Sell2 逆張り 片側のみ
トリガー |Current Zindex| > Zindex Open かつ Current Zindex < 0
動作 左側を買い、右側を売り。(方向は固定。Current Zindex ≥ 0 のときはエントリーしません。)
例 Zindex Open = 2.0、Current Zindex = −2.4。このモードは左を買い、右を売ります。現在のZインデックスが+2.4であれば、何も建てません。
使いどころ スプレッドのZindexがマイナス側だけを取引したい場合。実務上の理由としては、方向性のある相場局面の見方、ブローカーの証拠金の非対称性、あるいはZindexの低い側のセットアップだけが過去に利益を上げてきた片側的なペアの挙動などがあります。
Sell1Buy2 逆張り 片側のみ
トリガー |Current Zindex| > Zindex Open かつ Current Zindex ≥ 0
動作 左側を売り、右側を買い。(方向は固定。Current Zindex < 0 のときはエントリーしません。)
例 Zindex Open = 2.0、Current Zindex = +2.4。左側で売り、右側で買います。現在のZインデックスが−2.4であれば、何も建てません。
使いどころ Buy1Sell2と鏡像の関係で、Zindexがプラス側のセットアップだけを取引したい場合に使います。2つの別々の戦略インスタンスでBuy1Sell2と組み合わせ、それぞれの側をロットサイズを変えて独立して運用することもよくあります。
ZIndexSign 逆張り
トリガー |Current Zindex| > |Zindex Open| かつ Current ZindexとZindex Openの符号が同じ
動作 Current Zindex ≥ 0 の場合 → 左を売り、右を買い。Current Zindex < 0 の場合 → 左を買い、右を売り。
例 Zindex Openを+2.0(符号を明示)に設定。Current Zindex = +2.4 → 同じ符号 → 左を売り、右を買います。Current Zindex = −2.4 → 逆の符号 → 何も建てません。
ZIndexBasedのより厳格なバージョンを使うべきときは?しきい値を当初設定した方向にだけ戦略を取引させたい場合に使います。段階的なエントリーや方向性のあるペアのエントリーで、反対側の極端な水準では戦略を発動させたくない場合に役立ちます。
Reversed 順張り
トリガー |Current Zindex| > Zindex Open
動作 Current Zindex ≥ 0 の場合 → 左を買い、右を売り。Current Zindex < 0 の場合 → 左を売り、右を買い。(ZIndexBasedとは逆のレッグ割り当てです。)
例 Zindex Open = 2.0、Current Zindex = +2.3。このモードは左を買い、右を売って、スプレッドが平均からさらに広がり続けることに賭けます。
使いどころ スプレッドに対するモメンタムの賭けで、平均回帰の逆です。ペアが、乖離が回帰する前にさらに拡大する局面にある場合(例:一方の通貨が急激なトレンドにある場合)に適しています。相関の崩れは最初にこの方向で失敗しやすいため、逆張りモードよりリスクが高くなります。
ZIndexSignInv 順張り
トリガー |Current Zindex| > |Zindex Open| かつ Current ZindexとZindex Openの符号が同じ
動作 Current Zindex ≥ 0 の場合 → 左を買い、右を売り。Current Zindex < 0 の場合 → 左を売り、右を買い。
例 Zindex Open = +2.0、Current Zindex = +2.4。符号が同じで大きさがしきい値を超えている → 左を買い、右を売ります(動きに順張り)。
使いどころ Reversedのより厳格なバージョンです。モメンタムへの賭けですが、スプレッドが当初設定した方向にさらに広がった場合に限ります。同符号の条件により、反対側の極端な水準での誤ったトリガーを除外します。
Inversed 順張り トリガー反転
トリガー |Current Zindex| < Zindex Open — 不等号が反転している点に注意してください。このモードは、スプレッドがしきい値のバンドを超えたときではなく、バンドの内側にある間にエントリーします。
動作 Current Zindex ≥ 0 の場合 → 左を買い、右を売り。Current Zindex < 0 の場合 → 左を売り、右を買い。
例 Zindex Open = 2.0、Current Zindex = +0.6。大きさがバンドの内側 → 左を買い、右を売って、スプレッドが外側へ広がることに賭けます。
使いどころ 特殊なモメンタムのセットアップです。スプレッドが、小さな乖離が回帰せずに大きな乖離へと拡大する局面にあると考える場合に使います。事実上、他のすべてのモードとは正反対の考え方で、極端な水準を待つのではなく、早めにエントリーして拡大に乗ります。乖離が継続する挙動が強く観察されるペアで、控えめに使用します。
全8モードの比較
| モード | トリガー条件 | Z ≥ 0 のとき | Z < 0 のとき | グループ |
|---|---|---|---|---|
| ZIndexBased | |Z| > Open |
Lを売り、Rを買い | Lを買い、Rを売り | 逆張り |
| PriceBased | |Z| > Open |
Askの生の値で判断:Askが高い側 → 売り、低い側 → 買い | 逆張り | |
| Buy1Sell2 | |Z| > Open かつ Z < 0 |
エントリーなし | Lを買い、Rを売り | 逆張り |
| Sell1Buy2 | |Z| > Open かつ Z ≥ 0 |
Lを売り、Rを買い | エントリーなし | 逆張り |
| ZIndexSign | |Z| > |Open| かつ同じ符号 |
Lを売り、Rを買い | Lを買い、Rを売り | 逆張り |
| Reversed | |Z| > Open |
Lを買い、Rを売り | Lを売り、Rを買い | 順張り |
| ZIndexSignInv | |Z| > |Open| かつ同じ符号 |
Lを買い、Rを売り | Lを売り、Rを買い | 順張り |
| Inversed | |Z| < Open(反転) |
Lを買い、Rを売り | Lを売り、Rを買い | 順張り |
どのモードを選ぶべきか?
唯一の「正しい」モードはありません。選択は、そのペアの挙動についてどう考えるか、そして各極端な水準で戦略に何をさせたいかによって決まります。実用的な目安は次のとおりです。
- 新しいペアでゼロから始める場合は?ZIndexBasedを使ってください。最もシンプルな標準の逆張りモードで、スプレッドの両側で対称的なエントリーが得られます。
- 2つの銘柄の価格水準が大きく異なる(桁が違う)ペアの場合は?PriceBasedを試してください。zスコアの符号ではなくAskの生の比較を使うため、βが1.0から大きく離れている場合に、より信頼性が高くなることがあります。
- スプレッドの各側について、ロットサイズを個別に設定した2つの戦略を運用したい場合は?一方のインスタンスでBuy1Sell2(マイナス側のみ)、もう一方でSell1Buy2(プラス側のみ)を運用します。これにより、各側のロットサイズとストップを個別に設定できます。
- スプレッドがゼロを素早く横切るときの誤ったトリガーが心配な場合は?ZIndexSignを使ってください。CurrentとOpenの符号が同じときにだけ発動するため、反対側のノイズを除外できます。
- 乖離が回帰せずに継続する局面にあるペアを取引する場合は?Reversed(より厳格なバージョンはZIndexSignInv)。これはモメンタムへの賭けです。ばらつきが大きくなるため、それに応じてロットサイズを調整してください。
- 平均の近くでエントリーし、外側への動きに乗りたい特殊なセットアップの場合は?これができるのはInversedだけです。控えめに、そのペアがこのように振る舞うという強い根拠がある場合にのみ使用してください。
3つの実践ルール
- 導入しようとしているモードでバックテストする。Directionパラメーターは互換性がありません。同じペアでも、ZIndexBasedとReversedでは損益(P&L)曲線が大きく異なることがあります。実運用する予定のモードで最適化をやり直してください。
- 過去の損益(P&L)ではなく、戦略的な仮説に合わせてモードを選ぶ。あるペアでそのモードがなぜ機能するのかを説明できないなら、バックテストの結果が良かったというだけで導入しないでください。モードの選択は、そのペアの相場局面についての仮説に基づくべきです。
- セッションの途中でモードを切り替えない。ポジションを保有したままDirectionを切り替えると、あるルールのもとで建てたポジションを、別のルールを前提とした決済ロジックで扱うことになります。モードを変更する前に、すべてのポジションをきれいに決済してください。
よくある質問
|Current Zindex| > Zindex Open、つまり大きさの比較を意味します。Zindex Openは正の数(例:2.0)で表されるしきい値で、スプレッドが平均からどちらの方向にでも少なくともそれだけ広がったときに戦略が発動します。その後、選択したDirectionモードに応じて、Current Zindexの符号によってどちらのレッグを買い、どちらを売りにするかが決まります。
どちらも同じトリガー(|Z| > Open)を持ち、どちらも逆張りモードです。違いはレッグの割り当ての決め方にあります。ZIndexBasedはzスコアの符号を使います。Z ≥ 0 なら左を売り/右を買い、Z < 0 ならその逆です。PriceBasedはzスコアの符号を無視してAskの生の価格を比較し、価格の高い側を売り、低い側を買います。PriceBasedは、ペアの2つの銘柄の絶対的な価格水準が大きく異なる場合に最も有用です。
Inversedはトリガーが反転している唯一のモードで、スプレッドがバンドを超えたときではなく、バンドの内側にある間(|Z| < Open)にエントリーします。ペアが、小さなスプレッドの乖離が回帰せずに大きな乖離へと拡大する局面にあるという強い根拠がある場合に使用してください。これは珍しいセットアップです。ほとんどのペアの基本的な挙動は平均回帰であるため、Inversedは明確に観察・検証した特定の局面に限って使うべきです。
どちらもZの符号によるレッグの割り当てが同じ逆張りモードです。違いはトリガーにあります。ZIndexBasedは、符号にかかわらず大きさがしきい値を超えるたびに発動します。ZIndexSignは、さらにCurrent ZindexとZindex Openの符号が同じであることを条件とします。つまり、スプレッドがしきい値を当初設定した方向にさらに広がったことを意味します。ZIndexSignは反対側の極端な水準でのトリガーを除外し、ZIndexBasedは両方の極端な水準で対称的に発動します。
実用上の標準はZIndexBasedです。スプレッドの両側で対称的に動作する、典型的な乖離への逆張りペアトレードを実装しています。まずこれから始めて、現実的な執行条件のもとでバックテストし、明確な理由(相場局面の見方、非対称なロットサイズ、符号の確認、モメンタムの仮説)がある場合にのみ他のモードに移行してください。
はい。それこそが、これらの片側モードが存在する主な理由の一つです。同じペアで2つの戦略インスタンスを運用し、一方をBuy1Sell2(Zindexのマイナス側のみ)、もう一方をSell1Buy2(Zindexのプラス側のみ)にすると、ZIndexBasedと同等になります。違いは、各側のロットサイズ、ストップ、パラメーターを個別に設定できる点です。一方の側が過去により高い利益を上げてきた場合や、方向ごとにロットサイズを変えたい場合に便利です。
技術的には可能ですが、行うべきではありません。あるモードで建てたポジションは、どちら側が勝つべきかという暗黙の仮説に基づいてエントリーされており、決済ロジック、テイクプロフィット、ストップロスのルールはその仮説と整合するように動作します。ポジション保有中にモードを切り替えると、新しいルールセットが管理するように設計されていない未決済の取引が残ってしまいます。すべてのポジションをきれいに決済してから、次のセッションの前にDirectionを変更してください。
Directionはレッグの割り当てルールです。それ以外のパラメーター(Zindex Open、Zindex Close、ATRフィルター、ロットサイズ、テイクプロフィット、ストップロス)は、いつ決済するか、どれだけのサイズにするかを決めます。Directionモードはそれらのルールを変更しませんが、どのZindex Closeのロジックが適切かを変える場合があります(逆張りモードはゼロへの回帰を目標とし、順張りモードはより大きな乖離を目標とします)。Directionを変更したら、必ず決済パラメーターを再調整してください。パラメーターの完全なリファレンスはWikiにあります:sharptrader.arbitragesoftware.net/Pairs_Trading_Strategy。
SharpTraderでペアトレードを運用する
Directionパラメーターは、ペア戦略が本番で生き残れるかどうかを左右する複数の設定の一つです。その他の要素、つまりブローカーの執行品質、現実的なバックテストの前提、ウォークフォワード検証については、当社の総合ガイドとBEQIブローカー監査ツールキットで解説しています。
