SharpTrader Pairs Trading: Penjelasan parameter Direction — kedelapan mode Mei 28, 2026 – Posted in: Arbitrage Software – Tags: pair trading, pairs trading, statistical arbitrage, z-index
BJF TRADING GROUP · REFERENSI PRODUK
SharpTrader Pairs Trading: Penjelasan Parameter Direction — Kedelapan Mode
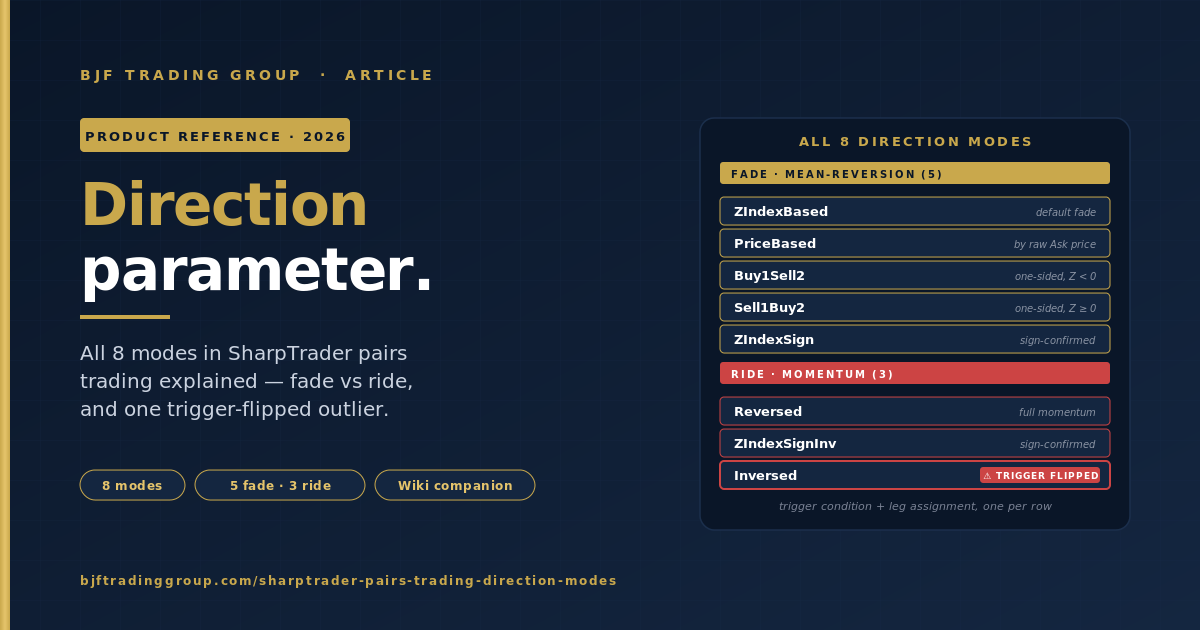
Direction mengatur sisi pasangan mana yang mendapat buy dan mana yang mendapat sell setelah ambang Zindex terpicu. Kedelapan mode terbagi menjadi dua kubu strategis — melawan divergensi (mean-reversion) dan mengikuti divergensi (momentum) — dengan satu pengecualian, Inversed, yang membalik kondisi pemicunya sendiri. Halaman ini adalah referensi praktis: apa yang dilakukan setiap mode, kapan terpicu, dan mode mana yang dipilih untuk setup yang benar-benar Anda perdagangkan.
Pengingat singkat: Current Zindex dan Zindex Open
Current Zindex adalah z-score live dari spread antara dua instrumen yang dipasangkan — berapa standar deviasi posisi spread saat ini dari rata-rata historisnya. Zindex Open adalah ambang besaran yang dikonfigurasi trader: begitu nilai absolut z-score saat ini melewatinya, strategi diizinkan membuka posisi. Parameter Direction kemudian menentukan kaki mana yang menjadi buy dan mana yang menjadi sell.
Untuk latar belakang konseptual lengkap — apa itu kointegrasi, mengapa spread kembali ke rata-rata, dan bagaimana z-score dihitung — lihat artikel utama kami tentang pairs trading forex dan arbitrase statistik. Halaman ini berfokus khusus pada parameter Direction dan delapan nilai yang dapat diambilnya.
Satu klarifikasi yang menjawab sebagian besar kebingungan
Wiki merumuskan pemicu sebagai “Current Zindex lebih besar dari nilai Zindex Open.” Jika dibaca secara harfiah, kondisi ini akan gagal ketika Z-index saat ini bernilai negatif. Dalam praktiknya, pengujiannya adalah perbandingan besaran: |Current Zindex| > Zindex Open. Zindex Open adalah ambang yang dinyatakan sebagai angka positif (misalnya 2.0); strategi terpicu ketika spread telah merenggang setidaknya sejauh itu dari rata-rata, ke arah mana pun. Tanda Current Zindex kemudian menentukan sisi mana yang long dan mana yang short.
Dua kubu strategis — dan satu pengecualian
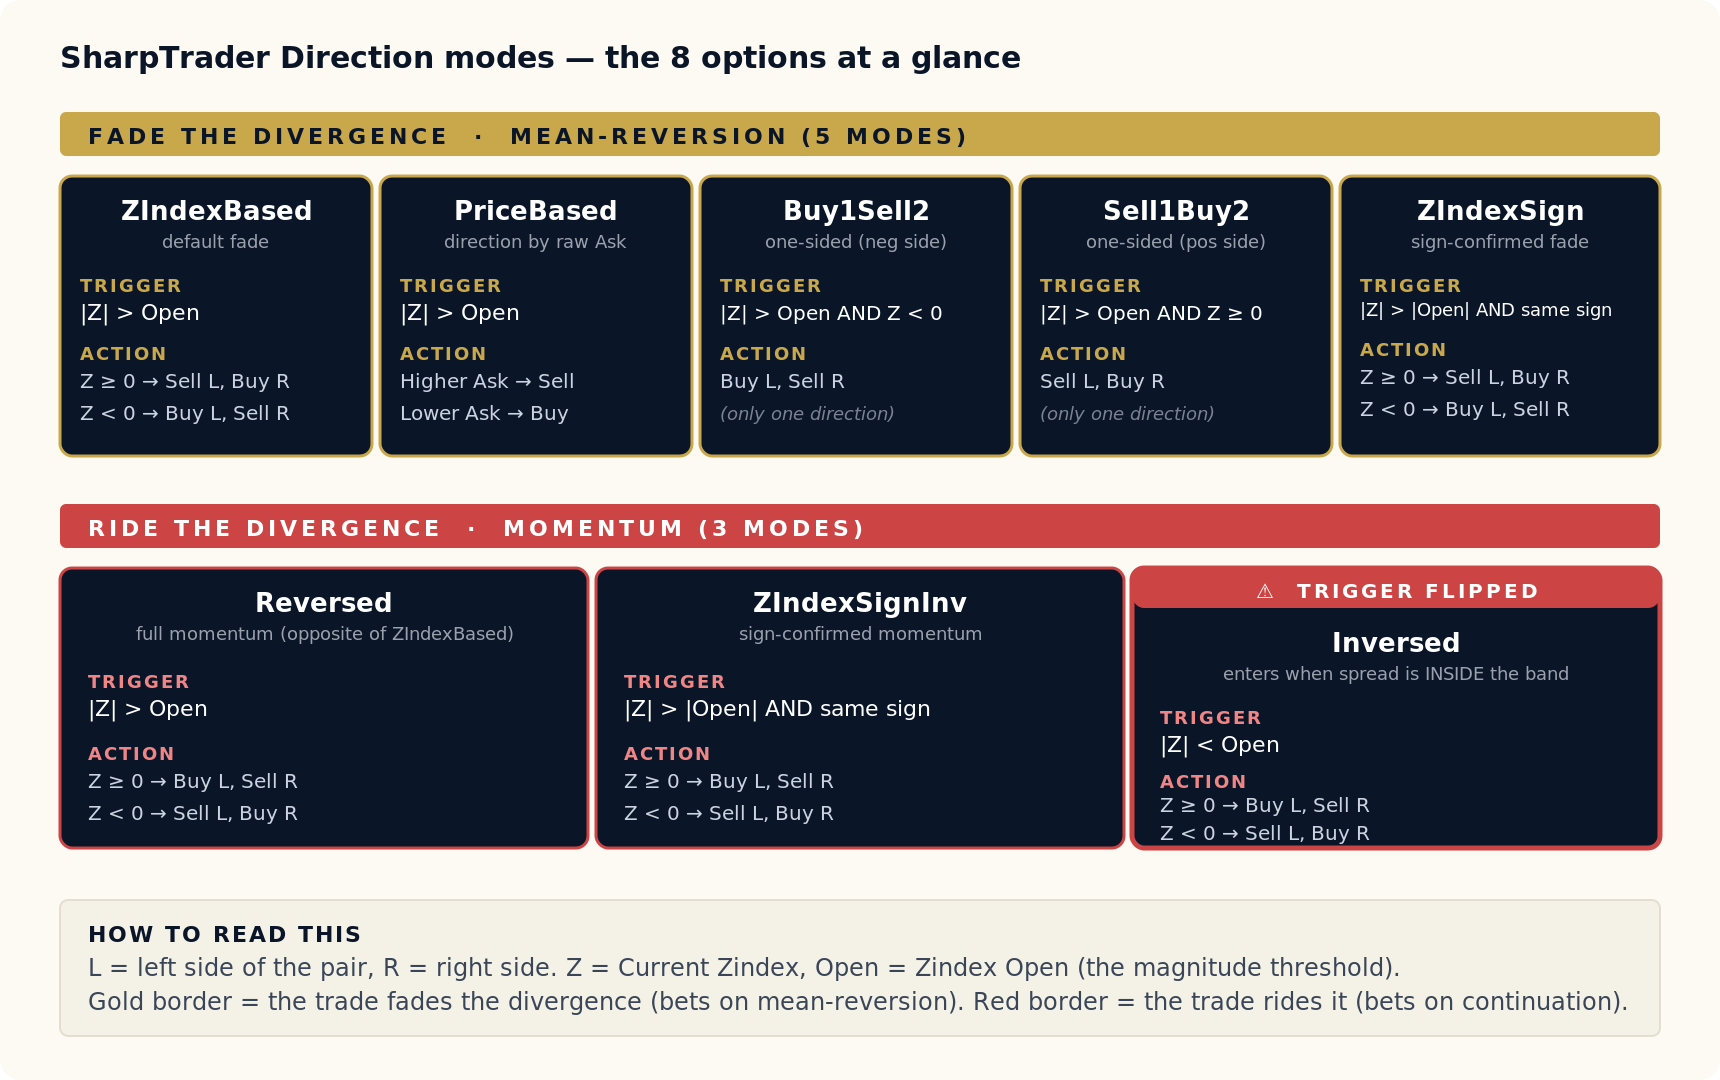
Setiap mode Direction mengodekan dua keputusan: kapan membuka posisi (kondisi pemicu) dan ke arah mana membukanya (penetapan kaki). Jika kedelapannya dilihat bersama, muncul tiga pola:
- Melawan divergensi (taruhan mean-reversion). Spread telah merenggang; transaksi bertaruh spread akan kembali ke rata-rata. 5 mode: ZIndexBased, PriceBased, Buy1Sell2, Sell1Buy2, ZIndexSign.
- Mengikuti divergensi (taruhan momentum). Spread telah merenggang; transaksi bertaruh spread akan terus merenggang lebih jauh. 2 mode: Reversed, ZIndexSignInv.
- Pengecualian — Inversed. Pemicunya dibalik: alih-alih menunggu spread merenggang melewati ambang, transaksi dibuka saat spread masih berada di dalam band, dengan taruhan spread akan merenggang ke luar. Ini satu-satunya mode yang terpicu di dekat rata-rata, bukan di titik ekstrem.
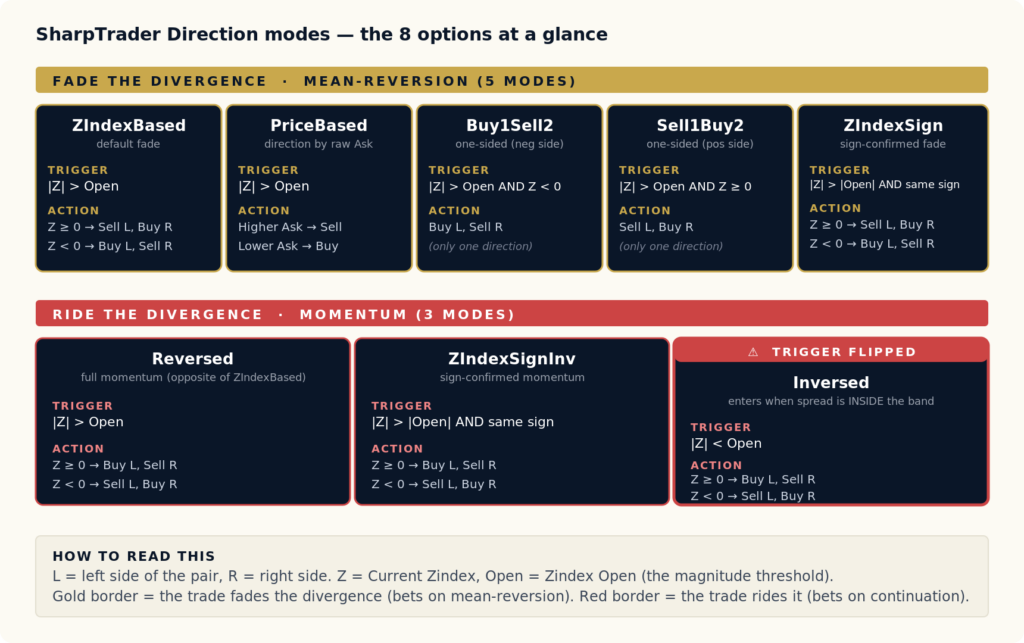
Gambar 1 — Kedelapan mode Direction secara sekilas. Bingkai emas = melawan divergensi (mean-reversion). Bingkai merah = mengikuti divergensi (momentum). Kartu Inversed memiliki penanda “pemicu dibalik” karena masuk posisi saat spread masih berada di dalam band ambang.
Referensi per mode
Setiap mode di bawah ini mencantumkan kondisi pemicunya (kapan terpicu), aturan penetapan kaki (sisi mana yang menjadi buy dan mana yang sell), contoh numerik konkret, dan jenis setup yang menjadi tujuannya.
ZIndexBased FADE
Pemicu |Current Zindex| > Zindex Open
Tindakan Jika Current Zindex ≥ 0 → sell sisi kiri, buy sisi kanan. Jika Current Zindex < 0 → buy sisi kiri, sell sisi kanan.
Contoh Zindex Open = 2.0, Current Zindex = +2.3. Mode ini menjual kaki kiri dan membeli kaki kanan, dengan taruhan spread kembali menuju nol.
Kapan digunakan mode fade default. Gunakan ketika Anda memercayai tanda z-score sebagai sinyal arah yang bersih dan menginginkan perilaku simetris di kedua ekstrem spread. Ini adalah konfigurasi awal yang paling umum.
PriceBased FADE
Pemicu |Current Zindex| > Zindex Open
Tindakan Jika Current Ask di sisi kiri > Current Ask di sisi kanan → sell kiri, buy kanan. Jika tidak → buy kiri, sell kanan.
Contoh Zindex Open = 2.0, Current Zindex = +2.3. Ask kiri = 1.0850, Ask kanan = 1.2640. Karena Ask kanan lebih tinggi, mode ini membeli kiri dan menjual kanan.
Kapan digunakan: Ketika β (koefisien kointegrasi) cukup asimetris sehingga perbandingan Ask mentah menjadi sinyal arah yang lebih andal daripada tanda z-score. Sebagian trader lebih memilih PriceBased pada pasangan yang kedua instrumennya diperdagangkan pada skala harga absolut yang sangat berbeda.
Buy1Sell2 FADE SATU SISI
Pemicu |Current Zindex| > Zindex Open DAN Current Zindex < 0
Tindakan Buy sisi kiri, sell sisi kanan. (Arah tetap; mode ini tidak masuk posisi ketika Current Zindex ≥ 0.)
Contoh Zindex Open = 2.0, Current Zindex = −2.4. Mode ini membeli kiri dan menjual kanan. Jika Z-index saat ini +2.4, tidak ada posisi yang dibuka.
Kapan digunakan Ketika Anda hanya ingin memperdagangkan sisi Zindex negatif dari spread. Alasan praktisnya: pandangan terhadap rezim arah, asimetri margin broker, atau perilaku pasangan satu sisi di mana secara historis hanya setup Zindex rendah yang menguntungkan.
Sell1Buy2 FADE SATU SISI
Pemicu |Current Zindex| > Zindex Open DAN Current Zindex ≥ 0
Tindakan Sell sisi kiri, buy sisi kanan. (Arah tetap; mode ini tidak masuk posisi ketika Current Zindex < 0.)
Contoh Zindex Open = 2.0, Current Zindex = +2.4. Transaksi menjual di kiri dan membeli di kanan. Jika Z-index saat ini −2.4, tidak ada posisi yang dibuka.
Kapan digunakan Cerminan dari Buy1Sell2 — ketika Anda hanya menginginkan setup Zindex positif. Sering dipasangkan dengan Buy1Sell2 pada dua instans strategi terpisah untuk menjalankan setiap sisi secara independen dengan ukuran posisi berbeda.
ZIndexSign FADE
Pemicu |Current Zindex| > |Zindex Open| DAN Current Zindex dan Zindex Open memiliki tanda yang sama
Tindakan Jika Current Zindex ≥ 0 → sell kiri, buy kanan. Jika Current Zindex < 0 → buy kiri, sell kanan.
Contoh Zindex Open diatur ke +2.0 (dengan tanda eksplisit). Current Zindex = +2.4 → tanda sama → menjual kiri, membeli kanan. Current Zindex = −2.4 → tanda berlawanan → tidak ada posisi yang dibuka.
Kapan menggunakan versi ZIndexBased yang lebih ketat? Gunakan ketika Anda ingin strategi hanya bertransaksi ke arah yang semula ditetapkan untuk ambang tersebut — berguna untuk entry pasangan bertahap atau berarah di mana Anda tidak ingin strategi terpicu di ekstrem yang berlawanan.
Reversed RIDE
Pemicu |Current Zindex| > Zindex Open
Tindakan Jika Current Zindex ≥ 0 → buy kiri, sell kanan. Jika Current Zindex < 0 → sell kiri, buy kanan. (Penetapan kaki berlawanan dengan ZIndexBased.)
Contoh Zindex Open = 2.0, Current Zindex = +2.3. Mode ini membeli kiri dan menjual kanan, dengan taruhan spread terus merenggang lebih jauh dari rata-rata.
Kapan digunakan Taruhan momentum pada spread — kebalikan dari mean-reversion. Cocok ketika pasangan sedang berada dalam rezim di mana divergensi semakin melebar sebelum kembali (misalnya satu mata uang dalam tren tajam). Risikonya lebih tinggi daripada mode fade karena putusnya korelasi cenderung gagal ke arah ini terlebih dahulu.
ZIndexSignInv RIDE
Pemicu |Current Zindex| > |Zindex Open| DAN Current Zindex dan Zindex Open memiliki tanda yang sama
Tindakan Jika Current Zindex ≥ 0 → buy kiri, sell kanan. Jika Current Zindex < 0 → sell kiri, buy kanan.
Contoh Zindex Open = +2.0, Current Zindex = +2.4. Tanda sama dan besaran terlampaui → membeli kiri, menjual kanan (mengikuti pergerakan).
Kapan digunakan Versi Reversed yang lebih ketat — taruhan momentum, tetapi hanya ketika spread telah merenggang lebih jauh ke arah yang semula dikonfigurasi. Syarat tanda yang sama menyaring pemicu palsu di ekstrem yang berlawanan.
Inversed RIDE PEMICU DIBALIK
Pemicu |Current Zindex| < Zindex Open — perhatikan bahwa pertidaksamaannya dibalik. Mode ini masuk posisi saat spread berada di dalam band ambang, bukan di luarnya.
Tindakan Jika Current Zindex ≥ 0 → buy kiri, sell kanan. Jika Current Zindex < 0 → sell kiri, buy kanan.
Contoh Zindex Open = 2.0, Current Zindex = +0.6. Besaran berada di dalam band → membeli kiri, menjual kanan, dengan taruhan spread akan merenggang ke luar.
Kapan digunakan Setup momentum khusus: Anda yakin spread berada dalam rezim di mana deviasi kecil berkembang menjadi deviasi besar alih-alih kembali. Pada dasarnya filosofinya berlawanan dengan semua mode lain — alih-alih menunggu titik ekstrem, mode ini masuk lebih awal dan mengikuti perenggangan. Digunakan secara terbatas, pada pasangan dengan perilaku kelanjutan divergensi yang kuat dan teramati.
Perbandingan berdampingan kedelapan mode
| Mode | Kondisi pemicu | Ketika Z ≥ 0 | Ketika Z < 0 | Kubu |
|---|---|---|---|---|
| ZIndexBased | |Z| > Open |
Sell kiri, Buy kanan | Buy kiri, Sell kanan | Fade |
| PriceBased | |Z| > Open |
Berdasarkan Ask mentah: Ask lebih tinggi → sell, Ask lebih rendah → buy | Fade | |
| Buy1Sell2 | |Z| > Open DAN Z < 0 |
tidak ada entry | Buy kiri, Sell kanan | Fade |
| Sell1Buy2 | |Z| > Open DAN Z ≥ 0 |
Sell kiri, Buy kanan | tidak ada entry | Fade |
| ZIndexSign | |Z| > |Open| DAN tanda sama |
Sell kiri, Buy kanan | Buy kiri, Sell kanan | Fade |
| Reversed | |Z| > Open |
Buy kiri, Sell kanan | Sell kiri, Buy kanan | Ride |
| ZIndexSignInv | |Z| > |Open| DAN tanda sama |
Buy kiri, Sell kanan | Sell kiri, Buy kanan | Ride |
| Inversed | |Z| < Open (dibalik) |
Buy kiri, Sell kanan | Sell kiri, Buy kanan | Ride |
Mode mana yang sebaiknya Anda pilih?
Tidak ada satu mode yang “benar” — pilihannya bergantung pada keyakinan Anda tentang perilaku pasangan dan apa yang Anda inginkan dari strategi di setiap ekstrem. Sebagai panduan praktis:
- Memulai dari nol pada pasangan baru? Gunakan ZIndexBased. Ini adalah mode fade default yang paling bersih dan memberi Anda entry simetris di kedua sisi spread.
- Pasangan yang kedua instrumennya memiliki skala harga sangat berbeda (orde besaran berbeda)? Coba PriceBased. Mode ini menggunakan perbandingan Ask mentah alih-alih tanda z-score, yang bisa lebih andal ketika β jauh dari 1.0.
- Ingin menjalankan dua strategi dengan ukuran independen, satu per sisi spread? Jalankan Buy1Sell2 pada satu instans (hanya sisi negatif) dan Sell1Buy2 pada instans lain (hanya sisi positif). Ini memungkinkan Anda mengatur ukuran dan stop setiap sisi secara independen.
- Khawatir tentang pemicu palsu ketika spread melintasi nol dengan cepat? Gunakan ZIndexSign. Mode ini hanya terpicu ketika Current dan Open memiliki tanda yang sama, sehingga menyaring noise dari sisi berlawanan.
- Memperdagangkan pasangan dalam rezim di mana divergensi berlanjut alih-alih kembali? Reversed (atau ZIndexSignInv untuk versi yang lebih ketat). Ini adalah taruhan momentum — varians lebih tinggi, dan Anda sebaiknya menyesuaikan ukuran posisi.
- Setup khusus di mana Anda ingin masuk di dekat rata-rata dan mengikuti pergerakan ke luar? Inversed adalah satu-satunya mode yang melakukan ini. Gunakan secara terbatas dan hanya dengan bukti kuat bahwa pasangan berperilaku seperti ini.
Tiga aturan praktis
- Lakukan backtest pada mode yang akan Anda gunakan. Parameter Direction tidak dapat saling dipertukarkan — pasangan yang sama dapat menghasilkan kurva P&L yang sangat berbeda dengan ZIndexBased vs Reversed. Jalankan ulang optimisasi untuk mode mana pun yang ingin Anda jalankan secara live.
- Sesuaikan mode dengan tesis strategis, bukan dengan P&L historis. Jika Anda tidak dapat menjelaskan mengapa suatu mode seharusnya berhasil pada pasangan tertentu, jangan menggunakannya hanya karena backtest tampak bagus. Pemilihan mode harus mengikuti tesis tentang rezim pasangan tersebut.
- Jangan mengganti mode di tengah sesi. Mengganti Direction saat posisi masih terbuka akan menyisakan posisi yang dibuka dengan satu set aturan dan logika exit yang mengharapkan aturan lain. Tutup semuanya dengan rapi sebelum mengganti mode.
Pertanyaan yang sering diajukan
Artinya |Current Zindex| > Zindex Open — perbandingan besaran. Zindex Open adalah ambang yang dinyatakan sebagai angka positif (misalnya 2.0), dan strategi terpicu ketika spread telah merenggang setidaknya sejauh itu dari rata-rata, ke arah mana pun. Tanda Current Zindex kemudian menentukan kaki mana yang buy dan mana yang sell, tergantung pada mode Direction yang dipilih.
Keduanya memiliki pemicu yang sama (|Z| > Open) dan keduanya adalah mode fade. Perbedaannya terletak pada cara menentukan penetapan kaki. ZIndexBased menggunakan tanda z-score: Z ≥ 0 berarti sell kiri / buy kanan, Z < 0 berarti sebaliknya. PriceBased mengabaikan tanda z-score dan membandingkan harga Ask mentah: sisi dengan harga lebih tinggi dijual, sisi dengan harga lebih rendah dibeli. PriceBased paling berguna ketika kedua instrumen pasangan memiliki tingkat harga absolut yang sangat berbeda.
Inversed adalah satu-satunya mode yang pemicunya dibalik — mode ini masuk posisi saat spread berada di dalam band (|Z| < Open), bukan di luarnya. Gunakan ketika Anda memiliki bukti kuat bahwa pasangan berada dalam rezim di mana deviasi spread kecil berkembang menjadi deviasi besar alih-alih kembali. Ini adalah setup yang tidak biasa; perilaku default sebagian besar pasangan adalah mean-reversion, sehingga Inversed sebaiknya disimpan untuk rezim tertentu yang telah Anda amati dan uji secara eksplisit.
Keduanya adalah mode fade dengan penetapan kaki yang identik berdasarkan tanda Z. Perbedaannya ada pada pemicu: ZIndexBased terpicu setiap kali besaran melampaui ambang, apa pun tandanya. ZIndexSign juga mensyaratkan Current Zindex dan Zindex Open memiliki tanda yang sama — artinya spread telah merenggang lebih jauh ke arah yang semula dikonfigurasi untuk ambang tersebut. ZIndexSign menyaring pemicu di ekstrem berlawanan; ZIndexBased terpicu secara simetris di kedua ekstrem.
ZIndexBased adalah default yang praktis. Mode ini menerapkan transaksi pairs trading kanonis yang melawan divergensi dengan perilaku simetris di kedua sisi spread. Mulailah dari sana, lakukan backtest dengan kondisi eksekusi yang realistis, dan hanya beralih ke mode lain ketika Anda memiliki alasan spesifik (pandangan rezim, ukuran asimetris, konfirmasi tanda, atau tesis momentum).
Ya — itulah salah satu alasan utama mode satu sisi tersebut ada. Menjalankan dua instans strategi pada pasangan yang sama, satu dengan Buy1Sell2 (hanya sisi Zindex negatif) dan satu dengan Sell1Buy2 (hanya sisi Zindex positif), setara dengan ZIndexBased, hanya saja Anda dapat mengatur ukuran, stop, dan parameter setiap sisi secara independen. Berguna ketika satu sisi secara historis lebih menguntungkan atau Anda menginginkan ukuran berbeda per arah.
Secara teknis bisa, tetapi sebaiknya tidak. Posisi yang dibuka dengan satu mode dimasukkan berdasarkan tesis implisit tentang sisi mana yang seharusnya menang — logika exit, take-profit, dan aturan stop-loss berperilaku konsisten dengan tesis tersebut. Mengganti mode di tengah posisi menyisakan transaksi terbuka yang tidak pernah dirancang untuk dikelola oleh set aturan baru. Tutup semua posisi dengan rapi, lalu ganti Direction sebelum sesi berikutnya.
Direction adalah aturan penetapan kaki; parameter lainnya — Zindex Open, Zindex Close, filter ATR, ukuran lot, take-profit, stop-loss — menentukan kapan keluar dan berapa ukuran posisi. Mode Direction tidak mengubah aturan-aturan tersebut, tetapi dapat mengubah logika Zindex Close mana yang masuk akal (mode fade menargetkan kembalinya spread ke nol; mode ride menargetkan divergensi yang lebih lebar). Setel ulang parameter exit setiap kali Anda mengganti Direction. Wiki berisi referensi parameter lengkap: sharptrader.arbitragesoftware.net/Pairs_Trading_Strategy.
Jalankan pairs trading di SharpTrader
Parameter Direction adalah salah satu dari beberapa kontrol yang menentukan apakah strategi pasangan bertahan di produksi. Kontrol lainnya — kualitas eksekusi broker, asumsi backtest yang realistis, dan validasi walk-forward — dibahas dalam panduan utama kami dan BEQI broker audit toolkit.
